
Google Calendar Appointment Slots

Tired of managing multiple email requests or transferring student conference times from a Google Doc? You can create appointment slots in Google Calendar and let your students sign up for the time they want to meet with you. The appointments will appear directly on your calendar. How easy is that?

  1. Open Google Calendar in Week view or Day view and click an empty time slot. 
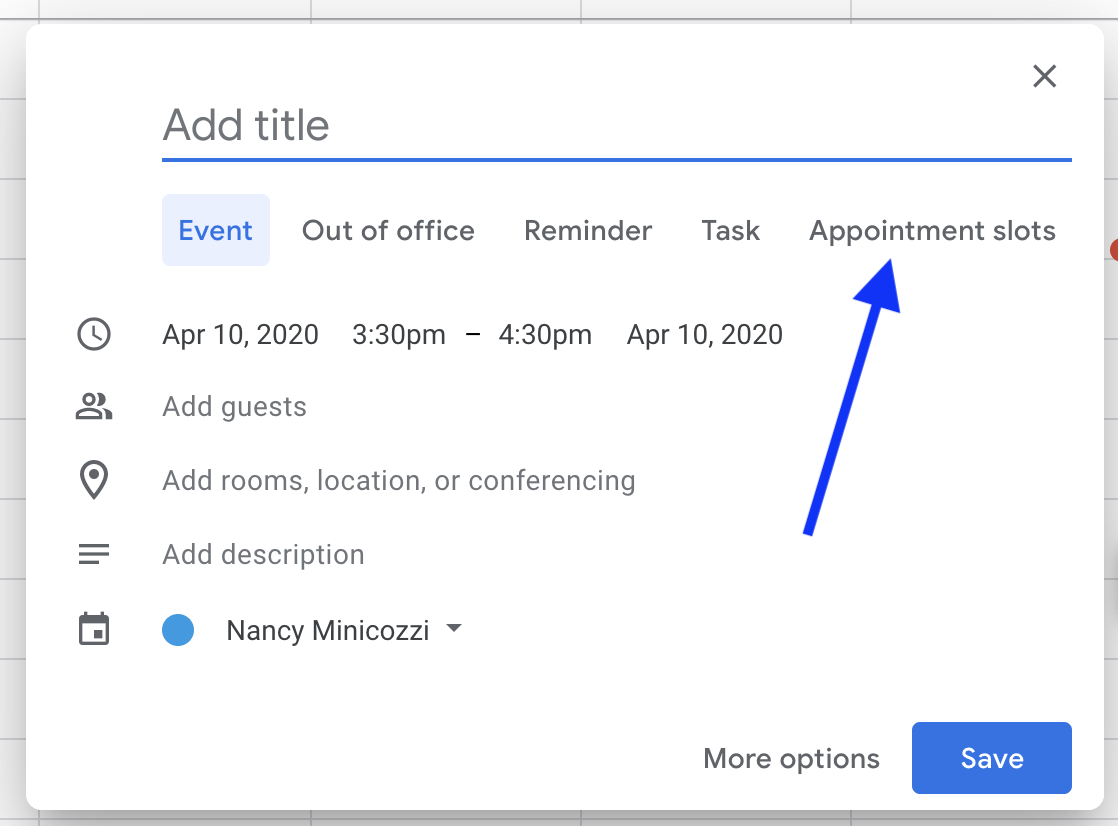
  2. In the event box that pops up, click Appointment slots
  3. Add a title and choose a date and time. 
  4. Select how long each appointment will be.
  5. (Optional) If you want to have the appointments on a different calendar, click the calendar name (often your name) to select the one you want.
  6. (Optional) Select More options to set up a repeating event or add a description. Pro tip: Use the description area to ask students to tell you what they want to discuss so you can be prepared.
Appointment slot creation link
Completed appointment block with indication of where to click to choose a different calendar or add more options

When you are finished, click Save. 

Your appointment block shows as a single event on your calendar, with a grid symbol  in the top-left corner.

Appointment slot block on Google Calendar
The grid icon in the upper left corner tells you this is a block of appointment slots.

Now you are ready to let students make appointments.

  1. Click on the appointment block in your calendar. 
  2. Copy and paste the appointment page link and send it to your students. Do not add students directly to the appointment slots on your calendar. This will add them to all appointment slots. Instead, direct them to the appointment page or add them yourself from that page.
  3. Students click on the link and create an appointment that you will see on your calendar and they will see on theirs. They will need to be logged into their Google account to make an appointment.
  4. As appointments are booked, they’ll appear as regular events overlapping the appointment block. They will have the same title as the appointment block title, but with the student’s name in parentheses at the end.
Link to copy for students and example of a filled appointment slot
Screenshot of Google Keep notes

Keep on Keeping with Keep!

Screenshot of Google Keep notes

Google Keep is a great way to get organized and stay that way. It’s a core GSuite service, but not many people know about it and all that it can do. I recently presented on Keep at the Spring CUE conference.

During that presentation, I promised a blog post with some image headers that people could use and/or edit. This is that post.

I have made several Google Slides that you can download as images and use as headers in Keep. To use the images in the slides as is, open the slide deck, go to the slide you want, and select File > Download as > png. You will get an image you can upload to your Keep note, where it will appear at the top. Use the color palette on your Keep note if you want the colors to match. Use File > Make a copy if you want to edit and personalize my Slides. Enjoy!

Embed PDF in Google Sites

One of the things I have been struggling with lately is how to embed a PDF in a Google Site. It turns out if you have the PDF saved in your Google Drive, it’s not that difficult. All you have to do is click on the PDF in your Drive, pop it out into a new window, and copy the embed code. Then you head over to your site, click to edit, choose HTML, and paste in the code. Update and save, then sit back and congratulate yourself on a job well done!

See the step by step instructions and animated GIFs of the process below.

Step 1: Open PDF in your Drive and click on the Pop Out window icon. This step is the key; you can’t get the embed code unless you pop out the window.

Pop-out window location

Step 2: In the new window, click the 3 vertical dots (more options) and choose Embed item…

Get embed code

Step 3: Copy the embed code.

Copy embed code

Step 4: Go to the page on your Google Site where you want to embed the PDF. Click the pencil icon to edit, then click HTML.

Open HTML editor

Step 5: Paste the embed code into the HTML editor. Click Update at the bottom.

Paste code and update

Step 6: Don’t forget to save!

Don't forget to save!


Animated GIFs of the process:

Getting the embed code
animated GIF of part 1 of embed process

Pasting the embed code
animated GIF of part 2 of embed process


QR Code Generators

A number of people have asked me recently about QR (Quick Response) codes. QR codes are those square, blocky looking barcodes that are seemingly everywhere these days. They can be read by mobile phones and tablets and can store website URLs, wifi network credentials, email addresses, calendar event information, preset text messages, and more.

They have many applications in education. You can have students scan a QR code using an iPad to visit a website instead of asking them to type in the URL. When giving an assignment, you can link to examples of quality student work. During Open House, you can use QR codes to identify the student creator of a “Who Am I” project? Add QR codes to book covers that link to student audio or video reviews of the book. Make scavenger hunts for your students or, even better, have them make scavenger hunts for each other or other classrooms. Create a QR code that brings up a text message for parents/students to use when subscribing to services like Remind (Thanks, David Bayne, for that idea). You are limited only by your imagination.

QR codes are easy to make. You can create them for free on many different websites. Whichever generator you choose, you will need to download and save or copy your QR code in order to use it. The QR codes below link back to this website and were generated by some of my favorite sites. I think it is interesting that they all look different, yet link to the same place.

  • goo.gl

    Goo.gl Google’s short URL creator also gives you QR codes that link to websites. Simply visit goo.gl, paste in the link to the webpage and click Shorten URL. The shortened URL appears on the right of your screen. Click the Details link underneath and you will see your QR code. If you use Chrome, you can install ShortenMe or another extension to generate a QR code through goo.gl for any webpage without leaving that webpage.
    Pros: Google Analytics, Chrome extensions
    Cons: Can only be used with webpages

  • Via QRstuff.com
    QRstuff.com

    QRstuff.com This site is very easy to use and allows you to create codes for a huge variety of uses. Just select the type of content the QR will link to, then fill in the blanks, set your color (yes, you can make colored QR codes!), and preview your code. When you are satisfied with the color, download the code by clicking the download button. The site is a little more cluttered than the others mentioned here, but it is still easy to use.
    Pros: Colored QR codes, ease of use, one click download
    Cons: Students may choose colors that do not provide enough contrast and the resulting QR code will not work

  • QR Code
    QR Code Generator

    QR Code Generator: This site provides a limited number of options for the contents of the QR code (text, URL, contact, phone number, or SMS), but it offers several choices for the resulting image. You can set the size you want, and you also have option of copying embed code or a direct link to the image instead of downloading and saving if you prefer. Students like seeing the code change as each character of the input is typed.
    Pros: Ease of use, choice of output
    Cons: Limited input sources

  • qr code
    GoQR.me

    GoQR.me: This is another site that allows you to make colored QR codes and see the barcode change as you enter information. The layout of the page is very clean and straightforward, so it simple to use. It works with a wide variety of input types and the generated code can be downloaded in a number of formats, or you can copy and paste the direct link or embed code for the image.
    Pro: Colored QR codes, ease of use, adjustable size
    Con: Possibility of QR codes not working due to low contrast color choice

Thank you to Lisa Nowakowski for recommending GoQR.me.

If you have a great way of using QR codes with students, please share in the comments.


Do You Tackk?

Recently, I discovered Tackk, a new way to post and share content online. It allows you to create an attractive one-page design that can incorporate content from over 250 online sources, including ThingLink (as in my example below), YouTube, Vimeo, Twitter, SlideShare, Google Maps, Prezi, and more. You do not need to create an account, but if you don’t, your Tackk will be deleted after a week.

(Scroll down to see the full Tackk.)

I have found Tackk to be very easy to use with many options to customize your work so you can get your Tackk to look just the way you want it. You can also turn the ability to comment on or off. One feature I especially like is that Tackk has partnered with 500px. If you need to add a photo to your Tackk, you can search 500px and the photo credit will be automatically added to your Tackk.

Applications for education: You could use Tackk to present content, give assignments (as in my example), but even better, you could have students create their own Tackks as evidence of learning. For example, students could each create ThingLink to examine various aspects of a problem and then combine them into one Tackk to provide an overview of the issue. You can create Tackkboards (collections of Tackks) for your students to post their content.

A Picture is Worth 1,000 Words: Google Drawing

If you have already made the switch to Google Apps, you have probably been experimenting with the Big 3: Docs, Spreadsheets, and Presentations. These are all great tools that support creativity, critical thinking, communication, and collaboration, but have you ever taken a look at Google Drawing? It’s one of the best tools you probably never knew you had. Hidden away from view, it is easily accessed with one click of the Create button in your Google Drive.

Google Drive create button

Working with Google Drawing is easy. You can add shapes (hold down the shift key for perfect circles or squares), arrows, lines, text boxes, and tables. Images can be uploaded from your computer, added via snapshot, or linked from the web. If you need to search for an image, Google Drawing has you covered. Just click Insert > Image, choose Search and you can select from copyright-friendly image results from Google Search, the LIFE Photo Archive, or stock images (these have some restrictions when used outside of Google Drive, so proceed with caution).

Once you have created your drawing, there are many ways you can use it in your classroom. For example, you can make seating charts or create content to use with students, such as KWL charts, math drawings, or virtual manipulatives. Even better, have your students use it to make any number of products, such as word webs, timelines, comic strips, or graphic organizers. In fact, there are so many ways to use Google Drawing, we have added a new page to the LVUSD Teaching with Google Apps website. Want to learn more? Visit the Google Drawing page.

This entry was cross-posted on the LVUSD Ed Tech Blog.

Tagul: Amazing Word Clouds

Although it isn’t a new service, I have just discovered a tag cloud generator called Tagul, and I have to say that I love it! You may be familiar with Wordle, Tagxedo, or WordItOut, which are all very good sites (although I have been having some technical issues with Wordle lately), but if you haven’t yet come across Tagul in your internet meanderings, I encourage you to head over as soon as you finish reading this post.

Two of the things that set Tagul apart are the ease with which you can incorporate custom colors and shapes as well as the ability to link the tags in your cloud to different pages. I used the coffee cup image from the front of my website, added the text of the About Me section, and set it up so the PLAYDATE tag linked to the PLAYDATE L. A. website. It only took me a few minutes and I am very pleased by the results. Hover over the graphic to see how it works.

Tagul has several other noteworthy features. You can put words inside other words, customize your fonts (even for individual words within the cloud), export your image as a scalable vector graphic, and specify final image size, among others. Like most of my other favorite sites, it’s free, although it requires users to register with an email address.

There are many ways to use tag clouds in the classroom. Use them to highlight key words and concepts in passages from literature or famous speeches. Create two clouds using primary source document accounts of the same historic event written from different perspectives and compare them. Create custom images for report covers or website headers. (Check out this one here; it’s my first effort, but I’m pretty proud of it!) If you have another great idea, please share in the comments.

12 Ways to Use Twitter in the Elementary Classroom

I recently completed a short course on Twitter for Professional Development. For my final assignment, I created a plan for conducting sessions on Twitter for the teachers at my school site. As part of the assignment, I created this graphic using Google Drawings. The professor liked it so much, he asked if he could add it to the course resources. Of course, I said yes, and also decided that if he liked it enough to share it, I should too. You can do the same.

Twitter for elementary

Click to see a full-size version.