Team of Huskies running

Amazing Race with Google Maps

I presented today at the Spring CUE Conference and had a great time. I was a little nervous because it was my first big conference since the pandemic, but it went well. I shared different ways to use Google tools to support world language and English language learners. You can see the slide deck here if you are so inclined.

One of the ideas I shared was an Amazing Race. If you aren’t familiar with it, here is a quick overview. Basically, students go to a map, click on a place marker, and see a challenge or task. They complete the challenge or task, then fill out and submit a form. When they submit the form, they receive a link to a new map with a new challenge. Want to give it a try? Here is a mini Amazing Race for you to play.

One of the participants asked for clarification about setting up the Amazing Race. Here you go, Gerardo!

It may seem complicated, but once you see how it all fits together, it makes more sense. I’ve tried to break it down into manageable steps. Having a planning document is key. Here is a template you can use. (Click on the blue Use template button to generate your own copy.)

Step 1: Decide on your content and identify places that are connected to that content. For example, my topic was Michelangelo, so in my example, I selected the Vatican, which contains the Sistine Chapel, and the Accademia, the museum in Florence where the statue of David is displayed. Additional locations I could have added include Bologna, where he worked for a time as a teenager, or places where his art is displayed, etc. Any type of tie in will work. On your planning document, note down each location.

Step 2: Identify what you want students to do at each location. You could ask them to explore the map, read an article, watch a video, or similar. What learning will take place at each location? Add this information to your planning document.

Step 3: Create a separate map for each place and add a marker to each one. The marker contains the challenge for each location. If you are asking students to look at an image or watch a video, you can embed them directly into the marker. If you want them to read an article or go to a website, you will need to type in that information and provide a link, if appropriate. Basically, each place marker has directions for the learning activity you identified in Step 2.Share your maps so anyone with the link can view. On your planning document, paste in a link to each map.

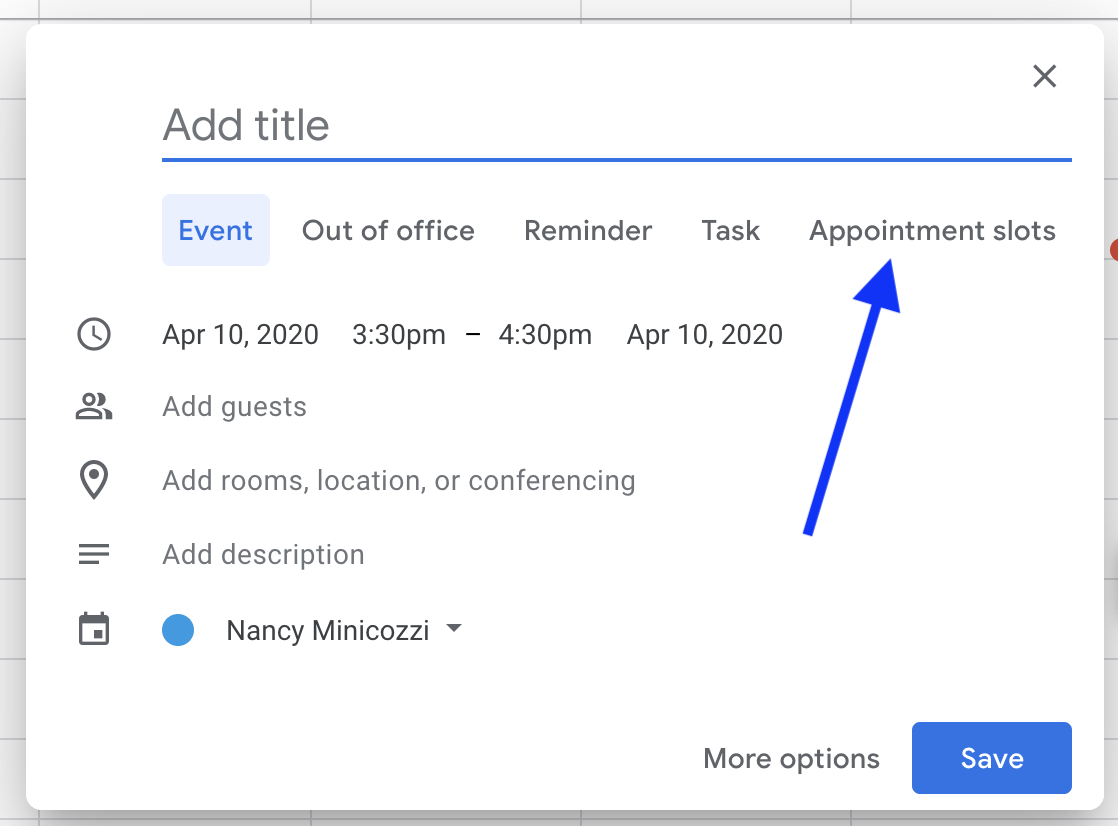
Step 4: Create a Google form for each place. Students will complete the form to submit their work. They may do this by simply answering questions on the form; you can use response validation to make sure that they can only proceed if they answer correctly. Another option would be to have students create something, for example, a slide deck or a Google Doc and ask them to submit the link on the form. On your planning document, paste in a link to each form. This is the link to where the students will go to complete the form, not the link you use to edit it, but you could include that too if you like.

Step 5: Tie it all together. Edit the place markers on your maps to include the link to the form for that location. Edit the confirmation message (under Presentation settings) on each form to give the students the link to the next map.

If you would like to see an example of a completed planning guide, you can visit this planning guide that I used to create the Amazing Race game linked above.

Pro tip: Create a folder in your Google Drive and save all the forms, maps, and planning documents in it so you have everything in one place.

clipart image of people

Email Everyone with Group Labels

clipart image of people

In Google Classroom, it’s easy to email all the students and/or guardians at once if you have a single class, but if you are a teacher with multiple Classrooms who wants to contact more than one class, it’s doesn’t seem so simple.

Actually it is, if you create labels using Google Contacts. It looks like a lot of steps, but you only have to do them once.

Step 1: Get email addresses from Classroom

  1. Go to the People tab.
  2. Click box at the top of the Students section to select all students in your class.
  3. Select all, then choose Email. You will not actually email them.
  4. Click one one of the emails in the bcc area, then use Control (PC) or Command (Mac) + A to select all the addresses. Copy them, and delete the message.
Click to email all students
Message created with all addresses

Step 2: Create list in Contacts 

  1. Select Contacts from the waffle or go to contacts.google.com.
  2. Select Create Contact.
  3. Select Create Multiple Contacts.
  4. Create a Label Name (how you will identify the group).
  5. Paste the email addresses you copied earlier.
  6. Click Create.
  7. Repeat Steps 1 and 2 to create additional groups or add more students to your existing groups.
Create multiple contacts
Screenshot of adding addresses, creating a new label, and creating the group

Now you are ready to email the group(s) from Gmail.

  1. Click Compose.
  2. Click bcc (so people don’t see each other’s emails).
  3. Start typing the name of the group (label name).
  4. When it pops up, click it to add all group members.
  5. Delete addresses or add more groups as needed.
Screenshot of the group label appearing in Gmail
Typing the beginning of the label causes it to appear. Clicking on it will add all group members to your email.

You can also create group labels for other groups, such as committee members, school teams, and more. Just copy and paste the email addresses into a label, and you are all set.

Google Calendar Appointment Slots

Tired of managing multiple email requests or transferring student conference times from a Google Doc? You can create appointment slots in Google Calendar and let your students sign up for the time they want to meet with you. The appointments will appear directly on your calendar. How easy is that?

  1. Open Google Calendar in Week view or Day view and click an empty time slot. 
  2. In the event box that pops up, click Appointment slots
  3. Add a title and choose a date and time. 
  4. Select how long each appointment will be.
  5. (Optional) If you want to have the appointments on a different calendar, click the calendar name (often your name) to select the one you want.
  6. (Optional) Select More options to set up a repeating event or add a description. Pro tip: Use the description area to ask students to tell you what they want to discuss so you can be prepared.
Appointment slot creation link
Completed appointment block with indication of where to click to choose a different calendar or add more options

When you are finished, click Save. 

Your appointment block shows as a single event on your calendar, with a grid symbol  in the top-left corner.

Appointment slot block on Google Calendar
The grid icon in the upper left corner tells you this is a block of appointment slots.

Now you are ready to let students make appointments.

  1. Click on the appointment block in your calendar. 
  2. Copy and paste the appointment page link and send it to your students. Do not add students directly to the appointment slots on your calendar. This will add them to all appointment slots. Instead, direct them to the appointment page or add them yourself from that page.
  3. Students click on the link and create an appointment that you will see on your calendar and they will see on theirs. They will need to be logged into their Google account to make an appointment.
  4. As appointments are booked, they’ll appear as regular events overlapping the appointment block. They will have the same title as the appointment block title, but with the student’s name in parentheses at the end.
Link to copy for students and example of a filled appointment slot
Top of the resources infographic

Copyright Friendly Resources Infographic

As some of my readers may know, I am pursuing ISTE certification, which “recognizes educators who use edtech for learning in meaningful and transformative ways.” As part of the program, I chose to respond to the following prompt:Write an honest reflection about your own habits regarding respect for intellectual property. Here is what I said:

I am, and always have been, a believer in the importance of respecting the intellectual property of others. When I was growing up and wasn’t sure what to do, I asked my father, who would invariably (and somewhat maddeningly) tell me, “Do whatever you think is right.” That has stuck with me.

Image credit: Frances Fischer. Used with permission.

If I want to borrow a fellow teacher’s stapler, I must ask permission. The same thing applies when I want to use an image that someone else created, and I want my students to know that they must have permission when using something that belongs to or was created by someone else, so I make sure that I always call attention to my citations. 

When creating presentations, blog posts, or other shared materials,  I always cite the images I include, even when I am not required to because the images are labeled as CC0 or Public Domain. This is because I believe that teachers are role models and we need to show students and other teachers the importance of always respecting intellectual property rights. I wouldn’t want students to think that I took something and didn’t cite it. It is better for them to know that I gave credit even when not required to do so. To help them understand, I created a YouTube video and hyperdoc (geared toward the elementary students with whom I was currently working) to teach them how to find and properly cite Creative Commons images.

I also present regularly on copyright and Creative Commons. I have shared information on copyright-friendly resources for teachers and students at ten conferences, and I have more scheduled in the future. In the presentation that accompanies my talk, I have included citations for all the images (gathered mostly from Unsplash, one of my favorite CC0 image-sharing sites) and provided lists for teachers of sites where they and their students can find copyright-friendly media to use in their work. I also include resources in these presentations for them to learn more. 

I think I am doing a good job with respect to how I use the intellectual property of others, and I am proud to say that I am confident that I am also doing well in sharing information with other educators about how to do the same. That being said, I know there is always room for improvement, and I will make every effort to do even better in the future.

Four months have passed since I wrote that reflection, and I still think I am doing a good job, but as times have changed (and that is, of course, putting it mildly), I know I need to do more. I have taken some of my favorite resources from the presentation above and turned them into an infographic to make it even easier for teachers to use. I will be sharing it with my staff this week, as well as on Twitter and in the various Facebook groups where I think it will be useful. I hope you enjoy it!

Top of the infographic
Click the link below to download the full PDF file
Screenshot of Google Keep notes

Keep on Keeping with Keep!

Screenshot of Google Keep notes

Google Keep is a great way to get organized and stay that way. It’s a core GSuite service, but not many people know about it and all that it can do. I recently presented on Keep at the Spring CUE conference.

During that presentation, I promised a blog post with some image headers that people could use and/or edit. This is that post.

I have made several Google Slides that you can download as images and use as headers in Keep. To use the images in the slides as is, open the slide deck, go to the slide you want, and select File > Download as > png. You will get an image you can upload to your Keep note, where it will appear at the top. Use the color palette on your Keep note if you want the colors to match. Use File > Make a copy if you want to edit and personalize my Slides. Enjoy!

Promo slide for Fall CUE

I’m presenting at Fall CUE 2019!

Fall CUE logo

Hooray! I am so excited to be presenting at the Fall CUE conference this weekend.

This year, the conference is in Sacramento, a new location, and I am excited to visit, since I’ve only been there very briefly before. I am looking forward to seeing friends and colleagues, meeting new people, having great hallway conversations, and attending sessions where I hope to come away inspired and full of new knowledge and ideas.

If you are attending Fall CUE, please join me at any of my sessions. You will find all the resources Presentations page of my website. I’m still tweaking, so they aren’t there yet, but they will be before the end of the conference. I’ve listed my sessions below, but if you see me in the hallway, feel free to stop me and say hello. (See the paragraph above to see how I feel about hallway conversations.) All my sessions are on Sunday, so I hope I’ll get a chance to meet and talk to lots of you on Saturday!

Sunday, October 20
8:00-8:45am Fall CUE Sticker Swap Outdoor covered seating area, between the cafeteria and the gym
9:00-10:00am Don’t Worry, Be Happy! and Copyright-Friendly H113
11:30am-12:30pm Create your own (virtual) reality H117

I hope to see you at #FallCUE, but if not, enjoy the resources and please reach out if you have any questions.

Infographic about the Classwork page on Google Classroom

Classwork Page Basics

I have been taking the Classy Graphics online course by Tony Vincent, and I have really been enjoying it. This week’s assignment was to create an infographic. Here is the one of the two I made. I’ll share the other one soon.

This infographic is a modification of one that Tony made on how to use Google Classroom. Google being Google, things have changed since he authored his, so I remixed it and created something to share with my teachers, since we just adopted Classroom this week. I really like how it turned out. I hope you do, too!

Infographic about the Classwork page on Google Classroom

And just in case Google changes again, here’s a link to the original Drawing file. You can make a copy, credit Tony and me, and remix it.

Screen shot of prompt to make a copy of the form

Share a copy of a Google Form

Everyone who has used Google tools for a while knows that Google likes to change things up every now and again. I was recently contacted by someone who told me the directions I gave in a previous post for sharing a Google Form as “view only” were no longer working, and she was absolutely right. Now to share a copy of a form, you now need to follow these steps. At least until Google makes some new changes.

  1. Create a folder and set the sharing so anyone with the link can view. You can also use an existing folder if you like.
  2. Put the form in the folder, either by
    1. Opening the folder and creating the form inside it, OR
    2. Moving an existing form into the folder
  3. Open the form as if you were going to edit it.
  4. Copy the URL (the one that ends with “/edit”).
  5. Change the word edit in the URL to copy.
  6. Share the new URL with those who need to make a copy of the form. They will be prompted to make a copy when they open the link.
Screen shot of prompt to make a copy of the form

Want to see how it works? I made a sample for you. The URL to my example form is https://docs.google.com/forms/d/1U-UUHh9iDmImDVhn1PEFxLXF3aKoPV7tZpZDMAG75Jk/edit, and if you click on it, you can see the form (it is in a folder that anyone with the link can view), but you can’t edit it or make a copy of it. With the word “copy” at the end, you are asked if you want to make a copy of the form, which you can then edit to your heart’s content. Give it a try: https://docs.google.com/forms/d/1U-UUHh9iDmImDVhn1PEFxLXF3aKoPV7tZpZDMAG75Jk/copy.

Friends old and new

CUE 19 Wrap Up

Well, another CUE conference is in the books, and like those before it, this one passed in a whirlwind. I learned a lot (mostly from the hallway sessions, if I’m honest), met so many people, walked over 15 miles, and got to share my passion for teaching and learning. What could be better? If you are one of the people I met, I hope you will stay in touch. We are always #BetterTogether!

To hear more about my thoughts on this year’s conference, take a few minutes to listen to Episode 73 of the TLC Ninja podcast, where Lisa and I share our thoughts on CUE 19.

Thanks to Ryan O’Donnell for creating the CUE By the Numbers template.

CUE 2019 by the numbers. Infographic.
Collage of photos taken at CUE 19.
Friends old and new!

My CUE 19 Sessions

I am proud and honored to be presenting at the National CUE Conference in Palm Springs this week.

Spring CUE is one of my favorite conferences. Not only do I get to be inspired by new learning and tools, but I also enjoy seeing friends and colleagues, making new connections, and spending time in an environment very focused on students.

If you will be heading over to CUE, please join me at any of my sessions. All of the resources will be linked on the Presentations page of my website before the end of the conference. Here’s where I’ll be and when. I hope to see and chat with you!

Friday, March 15
7:30am – 8:15am Meet the Authors @ Coffee CUE Ballroom Terrace, Renaissance Hotel 
10:00am – 11:00am Don’t Steal That! Copyright Friendly Resources for your Classroom Smoketree C, Convention Center 
12:00pm-1:00pm Membership Booth Pop-Up Lobby, Convention Center

Saturday, March 16
9:45am – 11:15am Come Live in a Pineapple! Open Your Classroom Doors! (Poster 3) Ballroom Foyer, Renaissance Hotel
2:00pm – 3:00pm Google for Education Certified Innovators Panel – Time to Slam! Primrose B, Convention Center 

Whether or not you are able to be at #CUE19 and attend my sessions, please feel free to reach out here or on Twitter if you have questions about any of the resources.